
We’ve covered the design mindset. We’ve dug into platform tools. We’ve broken down breakout rooms. And every week, the through-line has been the same: intentional design, not better technology, is what makes virtual training work.
This week I want to talk about the tool that changed how I design, deliver, and wrap up virtual training—not because it’s flashy, but because it solved a problem I didn’t even realize I had.
That tool is Canva. And before you think this is a post about making pretty slides—this is a post about reclaiming your time, streamlining your workflow, and showing up to every session with materials that match the quality of your facilitation.
The Time Leak Nobody Talks About
If you’ve been facilitating or designing training for any length of time, you know this experience: the content is ready, the learning objectives are clear, the activities are designed. And then you spend the next three hours reformatting a handout because a stakeholder changed the company logo, or rebuilding a slide because the template from last quarter doesn’t match this quarter’s branding.
That’s the hidden time leak in course design. It’s not the content—it’s everything around the content. Canva didn’t just help me make better-looking materials. It helped me stop losing hours to the administrative drag of keeping everything consistent, branded, and aligned across an entire program.
Before the Session: Setting Learners Up to Show Up Ready
The virtual learning experience doesn’t start when you click “Start Meeting.” It starts the moment a learner receives their first communication.
I use Canva to build everything that goes out before a session: registration confirmation graphics, pre-session slides, participant guides, and email header graphics. Because everything lives in one Brand Kit, my fonts, my colors, my logo, every touchpoint looks like it came from the same place. Consistent, professional, and on-brand without rebuilding anything from scratch.
 Additionally, I NEVER just send my slides to learners.
Let me hop on my proverbial soapbox. A printout of your slide deck is NOT a workbook. I use Canva Resize to convert my slides into a workbook and then move things around, consolidate content, add boxes, update graphics, add note spaces, and create interactive activities and instructions in the workbook.
Please, I beg you to make this the standard in our industry.
Okay, I am stepping off my soapbox. 😊
📌 Pro Tip: Create a simple “Preparing to Learn Online” asset in Canva—a one-page visual guide that sets expectations around technology, cameras, participation, and how to show up. Send it with your pre-session email. It normalizes the norms before you must establish them in the room. (Go a Little Extra: Create this in Articulate Rise).
During the Session: Canva as a Live Facilitation Tool
Canva Whiteboards for Breakout Activities
As we talked about last week, the most effective breakouts produce something visible. Canva Whiteboards give groups a collaborative canvas where multiple people can add sticky notes, sort ideas, build T-charts, and map processes—simultaneously, in real time.
Before the session, I pre-build a whiteboard template with labeled zones for each group. I drop the link in the chat before sending learners to their rooms. When they return, I share my screen and do a gallery walk through all groups’ work without any switching or scrambling. The result is a debrief that’s visual, immediate, and grounded in what the groups produced.
Interactivity Slides
I’ve built a set of Canva interactivity slide templates specifically for vILT—chat prompt slides, reflection frames, polling warm-up slides, and activity instruction slides. Because they’re built in Canva, they’re easy to customize for any client or topic while staying visually consistent.
These slides signal to learners that something is expected of them. A well-designed activity slide communicates “your participation is the point here” in a way that a text-heavy bullet slide never does.
Document Camera + Canva: An Unexpected Combination
One of the things I’ve started doing is pairing a document camera with Canva-designed workbooks. Learners see a polished, on-brand worksheet on their screen. I have a physical copy in front of my IPEVO camera. When I model how to complete it, they watch me think through it in real time, on paper, while they follow along digitally. There’s something about the analog-digital combination that adds presence and humanizes the session in a way that slides alone don’t.
After the Session: Making the Learning Last
Branded Recap Assets
A one-page visual summary of the session—key concepts, action items, reflection prompts—designed in Canva and sent as a PDF within 24 hours. Not a slide deck dump. A curated, designed document that learners actually keep. I’ve had participants print these and post them near their desks.
Repurposing Session Content
Every virtual session produces content worth repurposing key insights from the debrief, themes from the chat, reflection responses from learners. Canva AI 2.0 makes it easy to turn those raw outputs into quote graphics, tip sheets, or newsletter content—extending the reach of the learning without starting from scratch.
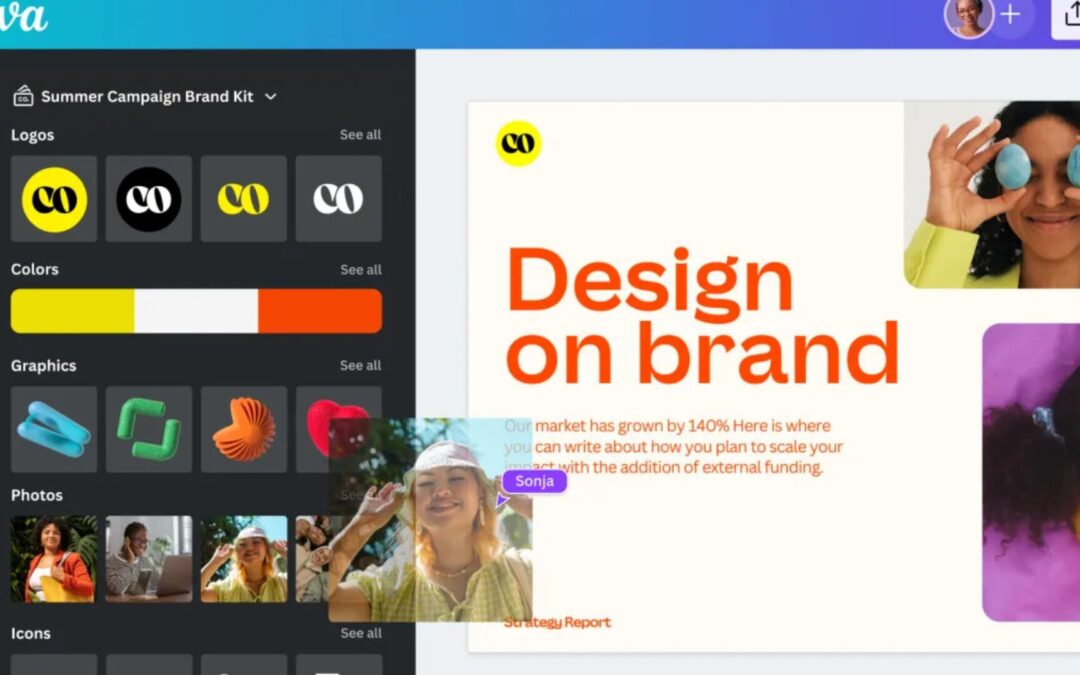
The Brand Kit: The Feature That Changes Everything
If there’s one Canva feature I would tell every L&D professional to set up today, it’s Brand Kit. Your colors, fonts, and logos are stored in one place. When you open any new design, your brand elements are immediately available. No hunting for hex codes. No rebuilding from scratch because someone updated the logo. For teams working across multiple clients or programs, you can create separate Brand Kits for each.
📌 Pro Tip: Set up your Brand Kit once and protect it. Consistent branding builds trust with clients before a single word of content lands. The investment is about 20 minutes, and it pays back every time you open Canva.
A Resource Worth Having I’ve put together a Canva vILT Interactivity Slide Template Pack specifically for virtual trainers and instructional designers—pre-built, customizable slides designed to support engagement at every stage of your session. Chat prompt slides, reflection frames, activity instruction slides, and more. If you’ve been building these from scratch every time, this will save you hours.
Wrapping Up the Series
Over the past five weeks, we’ve covered a lot of ground:
• Week 1: You don’t need a bigger budget—you need more intentional design
• Week 2: The Engage-Educate-Apply framework and the engagement benchmarks that keep learners present
• Week 3: The built-in platform tools on Zoom, Teams, and Adobe Connect most facilitators never use
• Week 4: How to design breakout rooms that produce real learning and debriefs worth having
• Week 5: How Canva functions as a system across the entire virtual training workflow
The through-line is the same idea we started with: better virtual training isn’t about a bigger budget or a fancier platform. It’s about intentional design, the right tools used with purpose, and a commitment to creating experiences that learners carry with them.
Thanks for following along. I’d love to hear how you’re applying these ideas in your own work—drop a comment, send us a message, or share this series with a facilitator or instructional designer in your network who could use it.
👉 Want more content like this? Join a 7-day trial of #IgniteLearningTM where you will find monthly masterclasses, resources, templates, community, and connection with other L&D professionals. And explore ZPS Spark Academy for on-demand learning designed to help you do your best work.